

Post by Hendi on Dec 20, 2018 23:21:53 GMT
Speeding Guide
Disclaimer: DO NOT expect anyone to use the metas described below in funs. Other people may be playing BA with different objectives in mind, so be courteous and respectful of others when playing in CBA, and don’t try to “force” any information in this guide onto them. It is fine to practice whatever you can from this guide in funs, but some of the speeding metas requires the whole team to use their respective metas, which you cannot and should not expect in funs.
The Purpose of this Guide
Hey everyone and welcome to the newest edition of the speeding guide! This is an updated version of the speeding guide from our old zeta which LHC put together. It includes a lot of new info, including a sorely needed updated attacker section, which Halleluhwah put together. Thanks to OLLVER , LHC , chris , auk , and raffealy for providing feedback.
The purpose of this guide is to get those who are interested more comfortable and familiar with up-to-date speeding techniques. It is also meant to be a tool for returning speeders who want to catch up on the latest speeding metas.
The meta changes very fast at BA and this is not meant to be a static guide. The intention with this guide is to remove and delete obsolete methods and add new and superior ones when they are discovered. If you think something should be changed, removed, or added to this guide feel free to bring it up in the Speed BA discord or on this thread.
A Couple of Notes
Speed teams are normally formed through PMs or in discord, so here’s a link to the Speed BA discord where you can find a teamfinder channel and a discussion channel for those of you who want to join the sweatier side of BA.
Lastly, this guide is quite long and it’s not meant to be read in one sitting. If you’re interested in getting into speeding my advice would be to start looking at the role you’re most interested in and get familiar with what to do on a few waves at a time – don’t tackle it all at once!
The Cannon
The cannon is an integral part of speeds as proper cannon usage easily saves 30s off the run.
Collector: You're responsible for making eggs last longer by precisely timing your loads. Your goal is to load while the main is stalled in the shooting animation and the other people have already shot. You may load as you see the first egg being shot out of the cannon as this will be the scroller's egg. This will allow you to load 1 egg even when 2 or 3 are being shot.
Here's a video of what proper execution looks like (note - he loads 1 egg but 3 are shot).
Defender/2nd attacker: Time your shots to the scroller's egg. As long as you aren't 1tick before the main then the collector is able to do his thing. But it helps to be as close to on the same tick as possible. To get shooting on the same tick as the scroller just start shooting when you see the first egg about to be shot out of the cannon. You can also shoot when you see the egg count go from 5 to 4 etc. in the interface.
Main: Your shots should be before or at the same time as everyone else. If you get on the cannon and someone is already shooting, line up your shots to theirs by clicking when their egg hits the ground.
If the main attacker gets to the cannon before the col loads its super easy to line up shots. Everyone just spam clicks where the red egg will be when the eggs are loaded and the scroller will automatically be 1tick ahead of the others.
Collector
The importance of the collector should not be underestimated in speeds, and the ability to get enough eggs and loading them early enough is very important in order to achieve the sweatiest of times. Along with the 2nd attacker, becoming a master of the yolk is a great way to get into speeding.
A few tips before getting into the guide
Below are a couple of channels with some great collector POVs:
Drop Trou
Kahvo
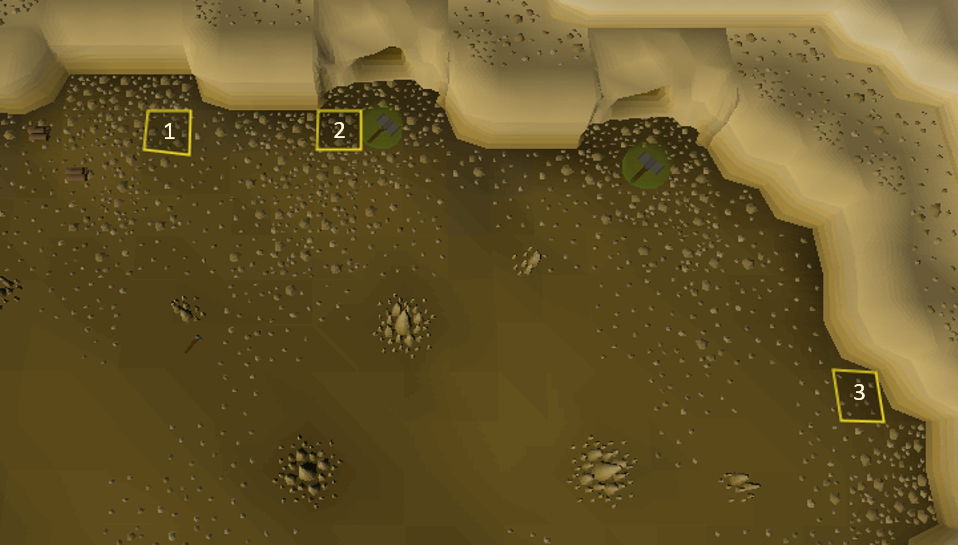
A few key squares
Specific squares that are being referred to in the guide are highlighted in the picture below.
1: The square where you block the 1st runner if it walks west on wave 2-4
2: The square you block runners afterwards on wave 2-4
3: The lure spot north on the wall that’s used on wave 4
EARLY WAVES
Your main job on waves 1-4 as a collector is to block runners. The only exception is when the 1st call is red on waves 2 and 3, in which case you shoot the last runner(s).
The Purpose of this Guide
Hey everyone and welcome to the newest edition of the speeding guide! This is an updated version of the speeding guide from our old zeta which LHC put together. It includes a lot of new info, including a sorely needed updated attacker section, which Halleluhwah put together. Thanks to OLLVER , LHC , chris , auk , and raffealy for providing feedback.
The purpose of this guide is to get those who are interested more comfortable and familiar with up-to-date speeding techniques. It is also meant to be a tool for returning speeders who want to catch up on the latest speeding metas.
The meta changes very fast at BA and this is not meant to be a static guide. The intention with this guide is to remove and delete obsolete methods and add new and superior ones when they are discovered. If you think something should be changed, removed, or added to this guide feel free to bring it up in the Speed BA discord or on this thread.
A Couple of Notes
Speed teams are normally formed through PMs or in discord, so here’s a link to the Speed BA discord where you can find a teamfinder channel and a discussion channel for those of you who want to join the sweatier side of BA.
Lastly, this guide is quite long and it’s not meant to be read in one sitting. If you’re interested in getting into speeding my advice would be to start looking at the role you’re most interested in and get familiar with what to do on a few waves at a time – don’t tackle it all at once!
The Cannon
The cannon is an integral part of speeds as proper cannon usage easily saves 30s off the run.
Collector: You're responsible for making eggs last longer by precisely timing your loads. Your goal is to load while the main is stalled in the shooting animation and the other people have already shot. You may load as you see the first egg being shot out of the cannon as this will be the scroller's egg. This will allow you to load 1 egg even when 2 or 3 are being shot.
Here's a video of what proper execution looks like (note - he loads 1 egg but 3 are shot).
Defender/2nd attacker: Time your shots to the scroller's egg. As long as you aren't 1tick before the main then the collector is able to do his thing. But it helps to be as close to on the same tick as possible. To get shooting on the same tick as the scroller just start shooting when you see the first egg about to be shot out of the cannon. You can also shoot when you see the egg count go from 5 to 4 etc. in the interface.
Main: Your shots should be before or at the same time as everyone else. If you get on the cannon and someone is already shooting, line up your shots to theirs by clicking when their egg hits the ground.
If the main attacker gets to the cannon before the col loads its super easy to line up shots. Everyone just spam clicks where the red egg will be when the eggs are loaded and the scroller will automatically be 1tick ahead of the others.
Collector
The importance of the collector should not be underestimated in speeds, and the ability to get enough eggs and loading them early enough is very important in order to achieve the sweatiest of times. Along with the 2nd attacker, becoming a master of the yolk is a great way to get into speeding.
A few tips before getting into the guide
- Watch Taste’s guide on the basics of speed collecting. Some of the information is outdated, but note the tips on converting eggs in particular. The timings and number of eggs has changed since that guide was posted, and the new numbers/timings are covered below.
- See Seb’s post on a few general tips such as the egg patterns. You will get a feel for this after collecting for a while, but you will be able to collect eggs faster by memorizing the egg patterns.
- Playing with a ground item overlay is highly recommended.
Below are a couple of channels with some great collector POVs:
Drop Trou
Kahvo
A few key squares
Specific squares that are being referred to in the guide are highlighted in the picture below.
1: The square where you block the 1st runner if it walks west on wave 2-4
2: The square you block runners afterwards on wave 2-4
3: The lure spot north on the wall that’s used on wave 4
EARLY WAVES
Your main job on waves 1-4 as a collector is to block runners. The only exception is when the 1st call is red on waves 2 and 3, in which case you shoot the last runner(s).
| Wave 1 Block the 2nd runner 1 square west of the runner spawn. Don’t block the 1st runner because that will require the defender to multi the runners, which is not needed otherwise. |
| Red call wave 2/3 Call “R” in the cc, get 2 red eggs on wave 2, and 4 red eggs on wave 3. Tip:
|
| Blue or Green call wave 2/3 Run along the east side of the western cannon, and click 5 squares west of the runner spawn. This is the last square the runner will walk to, and by blocking it here you prevent the 2nd runner from hard crashing. After blocking the 1st runner for a tick, run to the square west of the runner spawn and block the rest of the runners. Lastly, call which direction the last runner(s) walk on wave 2(3) in the cc. Tip:
|
| Wave 4 Block the 1st runner on the same square as on wave 2/3 if the 1st runner walks west. If it walks west, block it for 1 tick, then run closer to the healer cave to prevent dragging the healers over to the runner cave. If the 1st runner does not walk west, run straight over to the area around the healer cave. Try not to move around too much so the team's healer has an easy time not using poison meat on you. Make sure you block the 4th runner 1 square west of the runner spawn, and block it until 27s. At 27s, run over to the northern lure spot on the eastern wall to help trap the healer in case it agroes you. Here’s a vid where the 1st runner does not walk west Here’s a vid where the 1st runner walks west Tip:
|
MID WAVES
On waves 5 and 6 your role is basically to get a few eggs and loading early on during the 2nd call. The egg damage needed is low, but still makes a difference. What you do on waves 5+ will depend on what calls you get.
| Wave 5 Egg Code: 4-0 (4 eggs first call 0 eggs second call) Blue/Green 1st call Pick up 4 eggs and convert them. It's good to run west of the cannon on wave 5/6 to avoid healer relures. Important: Call before converting! The attackers need a fast call to use their claw spec (see attacker portion of this guide). Load the eggs and help shoot the 5th healer if it’s lured on the cannon. If you get unlucky and have 0 or 1 red egg after converting, call that in the cc so the healer can adjust accordingly. Red 1st call Pick up a few eggs (6 is more than enough), and help lure the 36s healer and place it north of the cannon if it’s lured on you. Run to load the cannon at 36s, and help shoot the 5th healer if it’s lured on the cannon. NOTE: Pay attention to potential relures and do not place them north of the cannon. |
| Wave 6 Egg Code: 6-0 (6 eggs first call 0 eggs second call) Blue/Green 1st call Pick up 6 eggs and convert them. It's good to run west of the cannon on wave 5/6 to avoid healer relures. Important: Call before converting! Load the cannon and try to lure the last healer by standing 1 square west of the defender. If you don't make it in time - or if the last healer doesn't target you - then you can help shoot the cannon. If the healer targets you then just stand still for the remainder of wave 6. Prioritize shooting runners if you see they won’t die before 60s. You can help shooting the healers, but often the healers that will be targeted by the cannon will already die by 60s, so shooting them will be useless. Example 48 doesn't aggro you: youtu.be/k3fT1e89wXQ?t=261 Example 48 aggros you: Can't find one (this is relatively new meta - probably started doing it around Oct 2018 not sure) Red 1st call
NOTE: When you get to the cannon, pay attention to the chat to and the map to see if any runners need to be shot for a 60s end. Prioritize shooting the runners over shooting the healers going forward. |
LATE WAVES
Your role as a collector on waves 7+ matters a lot to the team and the final time - late or low eggs will likely result in a subpar run.
| Wave 7 Egg Code: 8-4 (8 eggs first call 4 eggs second call) Red 1st call If eggs are dropped fast and you get 10+ eggs during the 1st call, don’t bother picking up eggs and converting during the 2nd call, and prioritize loading quickly. If the healer double overstocks, pay attention to the cc, if they call that the first call is good, or don't say anything, do not lure any healers. This requires you to loop around the middle as on wave 6. Let the defender lure the 42s healer and load the cannon. You can help shooting the healer once or twice if you have many eggs, but make sure there are enough eggs to kill it by 72s and prioritize waiting on the attackers and duping when needed. Red 2nd call Get 10 red eggs as fast as you can 2nd call and make sure you load before 57s. An early load is more important than getting more eggs, just 10 is enough so get just 10. Make sure you loop around the middle so you don’t lure the 48s and 54s healers. Green/Blue 1st and 2nd call You should be able to fill the collector bag during the first call, and then get about 4 eggs during the 2nd call. Always prioritize running to convert early, and you should run to convert at ~35-38s, and be able to load just before 57s. NOTE: Assuming the healer uses double overstock and gets 42/48/54 spawns, you can start shooting the cannon at 66s, since the ideal wave end is 72s. Thanks to raffealy for pointing this out. |
| Wave 8 Egg Code: 8-5 (8 eggs first call 5 eggs second call) Red 1st call If you have a fast healer on your team, 8 eggs should be enough as long as you and your team dupe the red eggs successfully. Therefore, if you get 10+ eggs during the 1st call, don’t bother converting, and instead help lure the healer with the highest hp only (the 6th healer), and place it on either side of the cannon (you can ask your healer if they have a preference, but try not to place it in the south-west or south-east of the cannon as it will not receive any splash damage from the eggs). Proceed to load the cannon, and dupe the red eggs. When you see the healer is going to die within 5 eggs you can help shoot but be careful not to shoot when the last healer is dying. Red 2nd call Collect 10 red eggs and load the cannon. If you have extra time check for a high HP healer wandering around the trap and try to lure it. It will target you after it heals a runner per the healer mechanics. Just make sure to load by 57s. Relures help, but not at the expense of a late load. Green/Blue 1st and 2nd call Similar to wave 7, you should be able to fill the collector bag during the first call, and then get 5 eggs during the 2nd call. Always prioritize running to convert early, and you should run to convert before 40s, and be able to load before 60s. With a good healer you normally don’t need more than 8 red eggs. NOTE: You can generally start shooting the cannon around 70s, since the wave should wave at 75s. |
| Wave 9 Egg Code 8-10 (8 first call 10 second call) Red 1st call Try to fill the pouch (8 eggs) first call. The monsters are bulky on 9 so this can be hard. Often you may not get that many eggs however due to late or “out-of-range” egg drops. In that case, collect eggs until around 50s, and convert the green or blue eggs. Red 2nd call Collect as many eggs as you can during the 2nd call. Try to grab a relure on your way to the cannon Blue/Green both 1st and 2nd call You should be able to fill up the collector bag during the 1st call. During the 2nd call collect until around 50s, then convert. I wouldn't try for relures on GB/BG unless they were painfully easy to get. Just load by 72s. NOTE: You can start shooting the cannon around 84s, and the target end time is 90s. If you see there's potential that the wave ends before 90s, either shoot earlier or don't shoot at all. You need to load by 72s because that's when the 66s healer spawn hits the cannon. It's good to load sooner and then help with relures by running east of the cannon. Sometimes there are healers wandering there looking for a player to target. |
| Wave 10 Egg code: 8-5 (8 first call 5 second call) Red 1st call If you get 10+ eggs during the 1st call you can prioritize trying to lure the 48s healer (DO NOT LURE THE 42~!), and load after that. Red 2nd call Try to lure the 48 healer. Pick up as many eggs as you can before ~47s then run into healer aggro range to grab the 48s. With the whole team in range the probability of a 48 lure is 80%. Load the cannon as soon as you can and help shoot the 48s healer. Once the attackers and defenders all get to the cannon you can focus on loading the cannon. Blue/Green both 1st and 2nd call You’ll normally be able to at least fill the collector bag. Collect eggs during the 2nd call until ~40s, and run to convert then load. NOTE: You can start shooting the cannon at ~72s if the healer is going for 78s wave end, or ~69s if the healer is going for 75s wave end. |
Attacker
First of all I recommend you check out Serpico's post to get some general advice on attacking as well as the most recent guide on forcing.
Huge thanks to Halleluhwah for putting together this entire section.
A few notes on attacking
Most of the difficulty of duo attacking lies in mastering the teamwork between the two attackers, so you’re able to maximize dps and drop monsters quick enough when needed. In order to do this there are established «guidelines» so you know what to expect from your teammate, and they knows what to expect from you. This means that the suggested methods in this guide aren't necessarily optimized, but will give you a general idea of where to start when entering speeds. Your ability to solve rounds with bad rng (fighters east and poor hits mainly) heavily relies on your chemistry with the other attacker. Feel free to discuss strats with him before or after the runs if you feel like things arent working out. Chances are that you will attack with them again in the future, so it will be worth it.
The rest of the attacker role revolves mostly around knowing spawn times for both rangers and fighters, as well as healers, and knowing when and how to lure them.
Duo attacking is split into 2 roles: The main attacker and the 2nd attacker. The main attacker will be responsible for killing fighters and forcing, while the 2nd attacker will mainly target the rangers.
Below are a few channels with great attacker povs
Auk
Chris
Drop Trou
flunch
henke18
Kahvo
Early waves
The early waves can be summarized by focusing on getting out reserves on time and saving specs for the 2nd call. With that said, it's easy to lose time as attackers if you don’t pay attention to some details.
Wave 1
Each attacker prioritizes killing off the first mob they’re assigned, spec if necessary. If you dont lose too many ticks and ensure that the fighter isnt moving as it dies, you can 3 hit it and still get the 3rd reserve out on time. You will almost always have time for 3 hits on the ranger. Reserves should spawn at 18 and 24 sec. Spec the 24 sec spawn asap as it spawns, they must be dead by 30 sec. |
Wave 2
Prioritize killing off 1st fighter. 2nd attacker helps out by hitting it once if it isn’t 1 hit by main. Last reserve (fighter) should spawn at 30 sec. For the 2nd call both attackers will guess their styles so the fighter can be specced before the collector calls. To do this the main attacker will first call out the style he will guess, then the 2nd attacker will call out 1 of the 2 remaining styles as his guess. They both spec with their guesses right after call change. If both guesses are wrong, spec immediately with the remaining style, ensuring the ko. As 2nd attacker you must wait 1 tick after call change to spec since the effect of the call change is delayed by 1 tick for anyone else than the main. As soon as the fighter has been killed, the main starts forcing the last runner. The force has to start before 36 sec, so you have to be fast. There really isn’t any difference for the attackers whether the 1st call is red, green, or blue on w2, you just have less time to waste speccing the last fighter since it has to be dead by 36 sec. As main you should also pay attention to the last runner if reds. If its being shot late you might have to force the wave end. |
Wave 3 - Green/Blue eggs 1st call
You will rarely struggle with getting out reserves on time this wave (last ranger should spawn at 36 sec). Save specs for 2nd call and make sure all mobs are dead by 42 sec. Main runs east and forces last runner. Make sure to start forcing before 42 sec. If the 2 first runners both are east or west, someone will call e-e in the cc for you before 30 sec. This means that you will have to force out the last runner so it spawns at 30.6 sec, since the 2 runner wont die in time. To do this just start forcing at 27-29 sec and end it when the 2nd runner dies, at 30.6 sec. The rest of the wave will continue as normal after this. |
| Wave 3 - Red eggs 1st call If red eggs 1st call on wave 3 the collector will get 4 red eggs and shoot runners at 30 and 36 sec. For the attackers this means 2 things. You need to kill off 2 monsters asap to get the egg as early as possible, and you will have to guess the 2nd call in the same fashion as on wave 2. In order to drop the eggs fast make sure the mobs are dead before you switch target. Since the main only needs 1 spec for his reserve 2nd call, he can use an msb or claw spec during 1st call if needed to drop the eggs faster. The process of guessing styles is the same on w3 as w2, but instead of speccing asap with the guessed style you will both test out your styles in order to find the correct style together, then spec with that style. For example, if the 1st call is aggressive and 2nd call is controlled, the main may call “acc”, while 2nd calls “def”. You will both hit 0s on your test hit and spec the remaining reserves with controlled. The wave should then end at 42 sec given correct defending and colling. |
Wave 4
Kill mobs as normal first call and spec last 2 reserves (last ranger/fighter should spawn by 36 sec). For fastest round time the mobs needs to be dead by 42 sec, so it’s important to not waste any time during 2nd call and spec the 36 spawns asap. Main runs east asap after 36 sec and forces last healer if necessary. Pay attention to the cc when you do this as the team might call 42 if they’re sure the healers will die by then, or force if they’re sure a force is needed. |
Wave 5
If the first call is blue or green eggs the collector needs eggs asap to convert on time. To do this efficiently the main specs the 2nd ranger as it spawns, while the 2nd attacker tags the 2nd fighter. The wave then continues as usual, with the main targeting fighters and 2nd on rangers. If the first call is red this won’t be necessary, and you can just kill mobs efficiently as usual. At 30 seconds the main starts running east as he tags the 30 sec fighter, and specs it as soon as possible, then dbows the 36 sec fighter and runs to the cannon to shoot the last healer if it’s lured. It’s important that he stands in lure range for the healer by 36 sec to potentially lure it. As main, if the last healer is lured onto the cannon and targeted by red eggs you will have to force a 51 sec wave end, to do this you will only have time to shoot 1 egg. If this isn’t the case and the healer says 54 in the cc or public chat you won’t have to do anything. It’s preferred that you, as main, do not use the cannon in this case to avoid potential anties. The 2nd attacker saves his specs for 2nd call and specs the 30 and 36 sec ranger, finishes off the last fighter if it’s still alive, then heads to the cannon to shoot the last healer if it’s lured. |
Late waves
On waves 6+, the attackers have 2 main tasks:
- Dropping early eggs for collector
- Luring and shooting healers.
The spawns and main goal of dropping eggs fast for collector while maintaining high dps is the same for the waves 6 to 10 for both the main and 2nd attacker. The only difference will be the stats of the mobs, which will get higher as the waves progress. As stated, your goal is to drop eggs for the collector as fast and efficiently as possible. In order to do this you will have to adapt to your rng (how well you hit and the spreads) and cooperate with your teammate accordingly. The only way to develop this skill is through many hours of gameplay, and by watching attacker povs for ideas on how to solve different situations. With this said, there are certain recurring strategies that are being used on each wave regardless of rng.
As the 2nd attacker you should always aim to claw spec 2nd ranger as soon as it spawns to keep it from drifting off. Then spec either the 1st or 3rd ranger, dependent on your 1st hit on the 1st ranger.
As the main attacker you have a bit more flexibility since you don’t have to claw spec. You should tag fighters as soon as they spawn and aim to kill them while they are in the north-west area around the ranger cave. Make sure to kill them off as soon as possible and avoid having many low hp fighters alive at the same time. Other than that, use your specs if your first hits on the early fighters are weak. If the specs aren’t needed, save them. They’ll be useful during 2nd call.
| Wave 6 After all the rangers and fighters are dead, you’ll both start heading east to the cannon. On wave 6 the healer will get 42 and 48 sec healer spawns, and will want both the healers to target either him, the defender or collector. This means you as attackers can’t be in lure range of the healers before 48 sec. To do this, you can choose to either stay west and run east at 49 sec or you can run south a bit before heading east in order to loop the healer’s aggro range. When arriving at the cannon prioritize shooting any leftover runners, the defender is likely to let you know either in cc or public chat if you need to shoot any. Next shoot the healers if it looks like the eggs shot will be useful, this will not always be the case however. As a main, if it looks like the healer wont finish the healers off by 63-66 sec you can extend the call either by firing the cannon at about 59 sec or by using other call extending techniques. This will be useful for the healer. |
| Wave 7 - Regular stock If the healer or defender calls out reg in the cc it means the healer did not overstock this wave and will be aiming for 42, 48 and 60 sec healer spawns. With these spawns the optimal healer lure will be having the 60 sec healer in front of the cannon and the 48 sec one at either side of the cannon. Having the 48 healer in the southern corner at either side is suboptimal compared to the other lure mentioned since it won’t receive any splash damage from the red eggs, so always aim to place it directly on the sides if possible. This will be relevant on wave 8 and 9 as well. In order to get these lures as consistently as possible the main attacker aims to be in lure range for the healer at 48 sec. When the 48 healer is lured by the defender or you, run to the cannon and get ready to shoot right after 60 sec. Do not shoot before 60 seconds as this will stall the healer spawn. As 2nd your job is to lure the 60 sec healer. Once the healer has spawned run to cannon and help shooting. |
| Wave 7 - Double overstock A highly skilled healer will aim to double overstock most of the time on wave 7. If they do they may call “dbl” in the cc at the start of the wave. This means that he’s aiming for 42 48 54 spawns and a restock at 30 sec. If they get these spawns they won’t want any healers to be lured by the attackers, similar to wave 6. This means that you will be looping around the healer’s aggro range once again when running east to the cannon, same way as on w6. When you start shooting as the main attacker will depend on when the collector loads the cannon. Just make sure you’re not shooting during the 60 sec call change as main, so you avoid extending the call for the healer by accident. The current “best” wave time is 72 sec. Force accordingly. Should the healer not get the 42 48 54 spawns for some reason, he will call “lure” , “bad” or something similar in the cc at around 30 sec when he runs back to the dispenser. This usually means that at least 1 healer will spawn at 60+ sec. Solving these bad spawns on wave 7 is a challenge for the whole team, and the optimal solution will depend on the spawn times. However, you will generally see that 2 healers has spawned before 60 sec, with the last healer at 60 or 66 sec. In these situations the last reserve is almost always the last healer to die, and should therefore be lured by the attackers onto the cannon. Having this lure will greatly increase the chance of a decent wave time. |
| Wave 8 The healer usually aims for 42 and 54 sec spawns this wave. As the main you will need to start running east at 45-51 depending on how many mobs you have left to kill. Be aware of the ranger spawning at 48 sec. Most of the times you will be done with your fighters as it spawns, in which case you can dbow the 48 ranger as you’re running east. If there is a lot of mobs left at about 50 sec, prioritize luring the 54 healer and be ready to shoot at 60 sec. Once again, make sure you’re not in the middle of a shot as the call changes at 60 sec. Also make sure to look after the 42 sec healer. If it’s on you, you’ll have to lure it on the west side of the cannon. As the 2nd attacker you will make sure everything is dead west as you run to the cannon. If every healer has spawned on time and is lured, go to the cannon asap. If not, you might have to wait for a delayed spawn before heading to the cannon. The current best wave time with this strategy is 75 sec. Force accordingly. |
| Wave 9 The healer will aim to have the last healer spawn at 66 sec this wave. You will generally be done with the mobs west at 54-60 sec, so you both have good time to go east and wait for potential relures before the last spawn. Optimally, the main attacker wants to get the relures, and place them on either side of the cannon, while the 2nd attacker only lures the last reserve. To do this consistently the main places himself a bit north-west of the cannon, so the healers by the defender trap has a free line of sight to him. The 2nd stays a bit south of the main, west of the cannon, so he doesn’t risk reluring healers east at the same time as the last reserve spawns. This should avoid stacking the last reserve with other healers. Start shooting as soon the last healer has spawned. A good wave 9 will end between 87-93 sec. Force accordingly. |
| Wave 10 Most healers will aim for 42, 48 and 60 sec healer spawns on wave 10. As attackers, you need to be in lure range by 48 sec to lure this healer. Don’t lure the 42 sec healer. If the 48 sec healer is on you, place it in the south-eastern corner of the cannon. If the 48 spawn is on the main or neither of the attackers, the 2nd stays and waits to lure the 60 sec spawn. If the 48 spawn is on the 2nd, both attackers go to the cannon, and let the defender lure the last healer. The last healer should be placed on the east side of the cannon. Don’t shoot during the call change, at 60 sec, to avoid stalling the spawn and call change. The expected healer dead time is at 75-78 sec. Force accordingly. As the queen spawns, the main forces the egg spawn, then waits for the queen to aggro someone before they move to the cannon and dupes the egg. Check out chris 's guide on how to make the omega egg instantly appear in the hopper in this guide. If you force using mind-shield looping the egg will appear in the shooters' interface later, consequently ending the wave later. NOTE: You don't need to click a prayer after equiping the shield, and you can return to force using 1t note. If the queen doesn't die after 1 egg you can stop the cycle when you see the first hit splat. |
Defender
The defender has become quite a challenging role since they are expected to perform more and more tasks for the healers that are getting ever faster times. Differently from healing, you can predict how the runners will move and act depending on their permutations, which means that it is arguably the least rng-dependent role as you can technically break down every scenario possible and act accordingly – although it may not seem like it at times!
Some of the main skills to master as a defender are:
- Speed
- Precision
- Memorization (of the runner patterns and how to deal with them)
- Luring and reluring
A list of posts that may be helpful
In-Depth Staggering+ Wave Breakdowns By LHC
When to 1-log and how to do it
How to Deal with Blocked Runners
Here’s a list of channels with some good defender POVs:
Auk
Chris
DefinePro
Drop Trou
flunch
Hendi
Kahvo
LHC
Oliver
Spud
Twoless
EARLY WAVES
The runners are the last NPCs to die on wave 1-3, so you cannot afford to make many mistakes here. Luckily it's relatively simple when you know what to do. The exception is when you get a red call wave 2-3, which is a bit more challenging, but still simple when you know what to do.
| Wave 1 Bump the 1st runner on its south side if it walks east. If both the 1st and 2nd runner walk east you have to multi them for a 30 second wave end. Otherwise you don't have to do anything, assuming the collector blocks the 2nd runner from going west. |
| Red call on wave 2/3- Credits to LHC This video covers how to execute reds as a defender. "Wave 2 and 3 red calls are a big barrier to entry for speeds. It took me several months of causing my teams resets to figure them out. Decided to make this guide showing off my current methods. Enjoy. Motivation/theory: The fastest theoretical time for waves 2 and 3 is 36s and 42s. This is because the last monster spawns at 30s and 36s on wave 2 and 3 respectively. In other words, if you try to force these waves by stalling the 30s/36s end checks you’d also stall the spawns. Since 30s runners will suffice for achieving these wave ends, the best thing to do is make the runners spawn at 30s instead of 24s. This is so the collector has more time to collect and load red eggs. Unfortunately this makes the defender’s job harder. What to do: While dropping one food north of the trap, followed by another food north-west of the trap, keep an eye on the minimap for the runner’s first movement. Below there are three different ways of executing the red call, depending on whether the first runner walks south, west or east." Below are a few clips from speeds First runner walks SS First runner walks SE First runner walks SW First runner walks W First runner walks ES First runner walks EE First runner walks EE and second walks west A few notes on SE runners. The most 'tricky' permutation is arguably when the 1st runner walks south then east. In LHC's guide above (the first link in in this section), it shows him dropping a food later than in the other cases. If you do this when the first runner walks SE, it will eat the food early and the 3rd runner will spawn at 24s instead of 30s, which is not ideal because you risk that it walks east on its first movement, in which case it will not be in the line of sight of the western cannon when you and the collector is ready to shoot it (you can use the eastern cannon in this case, but it's less consistent as you need to wait for the 2nd runner to die before you can shoot the cannon). A couple of ways to deal with it LHC has posted his way of dealing with SE runners in this video. Blocking the runner on the east side You will see that DefinePro uses this in a lot of his videos, and it works great for many scenarios. You simply block the runner on the east side, preventing SE from moving east, and drop the food a few ticks after the 2nd runner starts moving. The downside of this method is when that it will not work when you get SW-W the runners will not die by 30s, meaning that the 3rd runner doesn't spawn in time. The chance of SW-W happening is 1.85%. Blocking the runner on the west side (most consistent) The most consistent way to deal with every possible permutation is to block the 1st runner west (i.e. stand west of the first runner) - shoutout to henke for pointing this out. The advantage of this is that it will deal with the scenario where the first runner walks south then west, and the 2nd runner walks west. For this method to work when the first runner walks SE you need to wait until the 1st runner has stopped walking east for a couple of ticks. This will ensure that it targets and eats the trap food later, which results in the 3rd runner spawning at 30s. |
| Blue or Green call on wave 2/3 "There are some things to note on b/g calls as well. Putting all of your trap food north-west of the trap will save 1 tick off the end on south runners if the main attacker successfully forces. This is not negligible because if you continue a round that was force-force wave 2-3, placing food north-west may have saved 1.2 seconds, if both forces were on a south runner. Getting 24/30 spawns on wave 3 can be tricky if the first runner doesn't go south. Here’s a clip of a good technique that will fix east runners and prevent them from causing a crash In the video above above the east runner is blocked on its south side causing it to reach trap 1tick later. Due to runner mechanics this prevents the second runner from 'crashing.' More on runner mechanics at the bottom of this guide. An easier, but worse in some ways, alternative is to put your food on top of the trap. The blocked west / east runners eat 1 tick later and the south runner eats at the same time. It's worse unless you drop food north-west of the trap before the first call ends to save a tick on the wave end." When both the 1st and 2nd runner walk east on wave 3 (11.1% chance) In this scenario the 2nd runner will die slighly after 30s. The most common way to deal with this is to call 'e-e' in the cc, and the main attacker will stall before 30s and make the 3rd runner spawn at ~31.2s. If the runner is blocked by the healer it may spawn later. Another way to deal with E-E (although not often used in speeds as of this writing) is to use Dren's method in this video . Read the description for details. The advantage of this is that you do not lose the ticks by stalling in the method above. You use this method for any scenario on wave 3, but to pull this off succesfully you need to be significantly faster than normal. Lastly, remember to drop 2 correct food north-west of the trap when the 2nd runner dies. |
| Wave 4 Your goal here is to kill at least 2 runners and get to the lure north lure spot on the wall (highlighted on the picture in the collector section). You also need to avoid crashes and you can see which codes should ideally be used for different permutations. The codes here are 2-2, 1-2-1, and 1-3 depending on the permutation. |
LATE WAVES
On waves 5-10 you should delay in the south-eastern corner of the cannon until 12s into the waves. This means that there are many more potential runner patterns, and in order to become a great defender you'll need to become familiar with most of these, and learn how to deal with them - this will come with practice, so don't be discouraged if you make mistakes in the beginning!
| Wave 5 The ideal code for wave 5 is 1-3-1 or alternatively 2-3. The former code can be used as long as it's a 1-log scenario and the 4th runner is not west, in which case you use 1-4. The 1-log guide covers how to split and block certain runners in the relevant scenarios such that you can use the ideal code 1-3-1. After killing the 4th runner, run to the cannon and shoot the last healer which should be placed north of the cannon if it's lured on you, the attackers or the collector. |
| Wave 6 The ideal code here is 1-3-2, but you’ll have to use 2-2-2 in some scenarios – See the 1-log guide for when you can 1-log (i.e. use 1-3-2,) or 2-log (i.e. use 2-2-2). Most healers overstock nowadays, which means that the first reserve should spawn at 42s and the second reserve at 48s. Your job as a defender is to trap the 1st reserve north on the wall, step 1 square to the west after your healer has trapped the 1st reserve. The result will be that the 1st reserve is east of your healer, and the 2nd reserve is north of the healer. Here’s a clip of it in action. If the 4th runner walks west, and the 5th runner walks south or east, use the code 1(2)-4(3)-1 run to the lure spot, and stay there until your healer has trapped the penance healer north. After the healer is trapped, walk west and fix the trap. Here’s a clip of Raffealy doing it. If the 5th runner walks west, use the code 2-2-2 and follow the same step as above. NOTE: If the 2nd reserve does not agro you, you can run to the cannon and help shoot the reserves. |
| Wave 7 The ideal code is 1-3-2 (same as wave 6). If the healer double overstocks, the current meta is to only lure the 1st reserve, which spawns at 42s. You should ideally place it north of the cannon, and get out of range by the time the 2nd reserve spawns at 48s. If the healer does not double overstock, you can lure the 2nd reserve, and the attackers will usually lure help lure the 2nd and 3rd reserve. If the 2nd reserve is on you, place it east of the cannon. |
| Wave 8 The ideal code is 1-4-2. Alternatively use 2-3-2 or 3-2-2. You’re expected to relure the 6th healer, which should spawn at 42s, and place it on the east side of the cannon so that it receives splash damage. It is very helpful if you do not lure any other healers whatsoever (i.e. don’t stack the healers) so your healer doesn’t have to right click spam it. If you have the chance, place the other relures in the south-eastern corner of the cannon, and the 6th healer east. |
| Wave 9 The most popular codes for wave 9 are: 2-1-4-2 and 3-1-3-2 The advantage of 3-1-3-2 is that the last runner will spawn earlier, and therefore you don’t risk it dying late if it walks west on its first movement. You can only do this with certain permutations though. The disadvantage of it is that you may lose some potential relures depending on the healer spread. Also note that you have to drop one food south of the trap if the 8th runner walks east, because case the 9th runner walks south it will crash. You don't need to worry about this if you're using 2-1-4-2 because the 8th spawns at 48s and the 9th at 60s. You should ideally relure the healers that needs to be repoisoned, and unlure those that do not. It’s preferable to place the relures on the side for splash damage, but also split healers on the east side and in the south-eastern corners to prevent stacking the healers. You generally do not need to lure the 66s healer, and should prioritize getting relures and let the attackers lure the last healer. NOTE: It's very important that you call quickly at the 60s call change because the healer will already be at the dispenser at this point waiting to overstock. Any time wasted here will result in a later wave end. |
| Wave 10 The relure method for wave 10 is extremely helpful, as it close to guarantees that you will be able to relure the 48s healer if it agroes onto the healer first. You can see Auk’s video on it here. Below is a picture of the key squares that are used in this method. Disclaimer: I don't claim that these are the only squares that work for this method, but using them is very consistent. 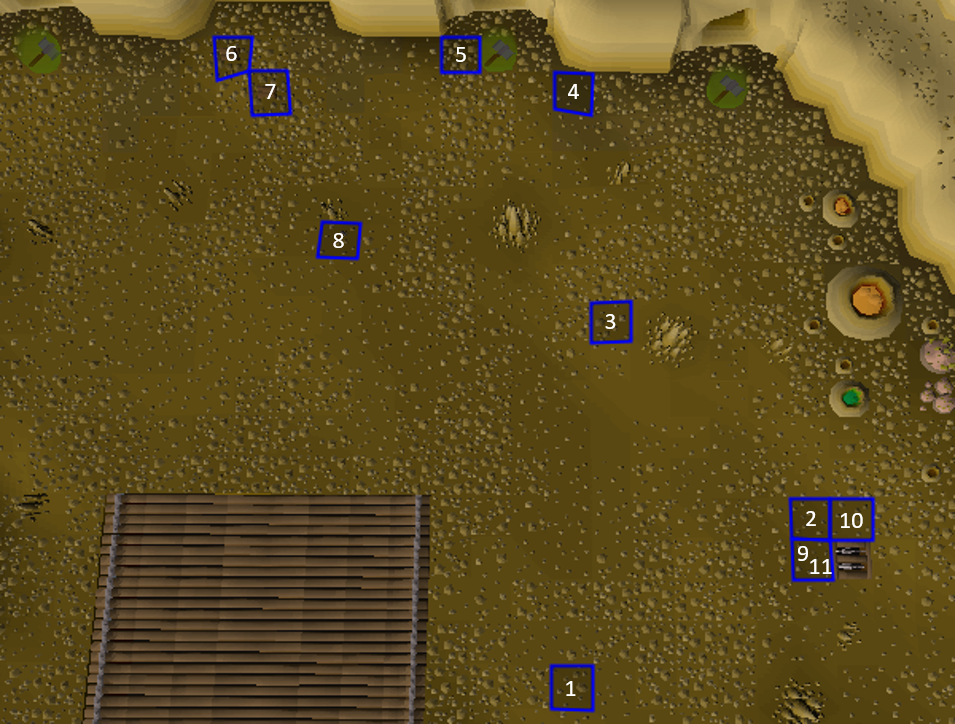 Here are the steps broken down:
|
Healer
Healing requires a lot improvisation, quick decision making, and memorization. Three of the main skills to master as a healer are:
1. Food placement and timing
2. Adaptability
3. Spamming
There are two main methods of healing as you’re probably familiar with: regular and overstocking. The first section of this guide covers the meta for not overstocking, and the last section covers overstocking.
A great way to learn new roles is to watch POVs from speeds. Here’s a link to the Best Times and Personal Best leaderboards where there are several POVs from different perspectives. I’ve also linked a few channels from the top healers in the sections below if you’re looking for POVs from either a non-overstock or overstock perspective in the respective sections.
Regular
Since most of the new healer POVs show os-codes I’ve compiled a list of channels of top players who uploaded non-os POVs before overstocking was a thing. Have a look at their old videos for examples of non-os.
Channels with non-os codes (in their older videos):
Chris
Drop Trou
Ethan
Markipedia
Oliver
On top of that, here are a few videos I highly recommend watching if you're learning regular codes.
Healer Micro Guide - Record Analysis
Two Quick Healer Tips
Healing "Opening Strategy"
Food Spacing Guide
| How to Read the Codes Learning the healer codes is one of the fastest ways to improve as a healer and get faster times. One of the most common questions new healers have is how to read the healer codes, which can look confusing at first, but it's quite simple. People write them a few different ways, but I'll illustrate the two most common ways by using an example from wave 5.
OR
These are just formatted differently. I've written the codes using the format from the first example in this guide, so here's how to interpret them using that version.
NOTE: All the codes assume that healer's don't tick 3s. One notable exception is wave 9 where some healers can tick 3s and still die at or before 90 seconds. The codes below are not the only way to achieve the ideal time each waves, but a decent suggestion. You can always refer to henke’s foodspacing tool if you want to see if there are any alternative codes that work better for you. |
Wave Breakdown
| Wave 1 – <30s 1-1 |
| Wave 2 – 33s (needs to die before 36s for force end) 2-2-4 |
Wave 3 – 39s (needs to die before 42s for force end)
The extra food on t/w calls is used on the first healer to make forcing easier (it dies around 38s instead of 41s) |
Wave 4 – 42s
Tip on tofu/worms call
Tip on meat call
NOTE: You can use the explorer's ring to alch the horn which mean you'll have 9 of every food, which makes wave 4 more consistent. You can do it by clicking alch before entering wave 4 and hover it over the first inventory slot and click alch when you enter the wave, which Chris does here. Also note that you can click to alch the horn slightly before you enter the wave. |
Wave 5 – 54s (requires the last healer to be shot, otherwise 57s)
Tip:
|
Wave 6 – 66s
Tip:
|
Wave 7 (and 10) – 78s
Tip:
|
Wave 8 – 78s
Tip:
|
Wave 9 - 90s
Tip:
|
Wave 10 – 78s
Tip:
NOTE: Similar to wave 4, you can alch the horn here. You can either do it as on wave 4, which Trou does here, or click by (or on) the dispenser then alch the horn then the dispenser again, which Chris does here. |
Overstocking wave 5-9
The meta is currently to overstock on wave 5-9 and was made popular by Dr Lumbridge and flunch . The original codes can be found in this post.
When single overstocking there’s no difference between meat, tofu, or worms 1st call since you’ll have 12 of the overstocked food, and 7 of each of the two other foods. When double overstocking you’ll have one additional food during the 1st call if it’s tofu.
Disclaimer: I do not claim that these methods are the best, but they are really good.
First off, here’s a list of channels with great healer POVs:
Auk
Chris
flunch
gray goon
Infra Low
Kahvo
Oliver
Pretz
Spud
| Wave 5 – 54s(51s) – 36s spawn NOTE: There are a few different versions of os w5, but the most popular as of posting this guide is 51 if the 5th healer is lured, and 54 otherwise. 5th healer not lured/shot: 2-5-2(21)-3(30) // 0-0-0-0-7 5th healer lured/shot: 2-5-2(21)-3(30) // 0-0-1-1-5 Tip:
|
| Wave 6 – 60s – 42/48 spawns There are also different versions of wave 6 depending on preference and they have their own advantages and disadvantages. Version 1 3(18)-5-2(24)-2 // 0-0-0-1-8-10 Advantage: You don’t need to repoison the 3rd healer during the 2nd call, which reduces your dependency on good spread/rng. Disadvantage: If the 3rd healer wanders off you may not be able to repoison it at 24s and still poison the 4th healer in time. Tip:
Version 2 3(18)-5-3-1 // 0-0-0-2-8-10 Advantage: No spacing needed on the 3rd healer, and you only need to use 1 food on the 4th healer, meaning you can run to restock earlier. Disadvantage: You need to use 1 more food on the 4th healer during the 2nd call, which means you may get to the 5th healer a bit later. |
| Wave 7 – 72s – 42/48/54 spawns The meta for wave 7 is currently to double overstock. The 1st call of wave 7 is one of the hardest thing you’ll learn as a healer, but with some practice it’s pretty consistent. It is highly advised to check out the POVs from the top healers. Good news is that the 2nd and 3rd calls are relatively simple to pull off. As mentioned above, if you get tofu 1st call you’ll have 1 more food to use on a healer, which can be very helpful during the 1st call on wave 7 since you don’t need to time the food on the 2nd healer. The meta is currently to ONLY lure the 42s healer, and your defender will preferably place it north of the cannon, or worst-case at the east side of the cannon, and the codes below assumes this happens. If this doesn’t happen you need to adjust accordingly, and Dr. Lumbridge’s guide covers how to adapt the code if there’s a different healer that gets shot and lured.
Tip:
|
| Wave 8 – 75s – 42/54 spawns There are also different versions of wave 8 codes, but below are 2 common ones. Version 1 2-8(21)-1-1 // 1(36)-0-1(33)-1(39)-3(45)-1 /RESTOCK*/ 0-0-0-0-0-5(6)-SPAM *Guess 13-14 at restock Advantage: You can finish the 2nd healer earlier Disadvantage: The 2nd healer can’t afford to tick any 3s Version 2 3-7(24)-1-1 // 1(36)-0-1(33)-1(39)-3(45)-1 /RESTOCK*/ 0-0-0-0-0-5(6)-SPAM *Guess 13-14 at restock Advantage: You have 1 more food to use on any healer really, and it reduces the chance of it ticking 3s. Ideally you want to use it on the 1st healer. Disadvantage: There is a chance the 2nd healer will wander off, and you may be further away from it when you need to repoison it than if you used version 1. Tip:
|
| Wave 9 – 87s – 48/66 spawns 2-8(21)-1-1 // 1-0-1-1-1-1-1 /RESTOCK/ 0-0-0-0-0-1-2(3)-5(6)-SPAM Tip:
|
Wave 10 78s (Same regular)
Tip:
NOTE: Similar to wave 4, you can alch the horn here. You can either do it as on wave 4, which Trou does here, or click by (or on) the dispenser then alch the horn then the dispenser again, which Chris does here. Also note that you can click to alch the horn slightly before you enter the wave. |